
 I made this beaded vase long time back. Unfortunately, the steps were not photographed as I did not even have a wildest idea then that I would be sharing this with the world one day. I searched all over the net for a tutorial with photos, but couldn't find any. In fact, I could not even find the idea in the net. I am too lazy to make one again for the sake of blogging, but I will try to explain it in words. But don't tell me I didn't warn you, this thing could test your patience. The bright side is that your friends would be surprised to hear that you made it yourself.
Things you will need:
-plastic beads. See if you can get some with big holes, as that could save some effort.
-plastic thread. Find something strong and yet thin.
Take a long piece of thread. First thread 18 beads on to your thread. Your aim is to make a circular base. Once all the 18 beads are threaded, insert your thread again into the same circle once more to make it stronger. See the circle in the photo below.
 Once the circle is done, take 5 beads and thread them again in the same thread at the end of the circle. Bring back the thread and loop it again to your circle two beads after where you started. Confusing, is it? I hope the below pic will clear your head.
 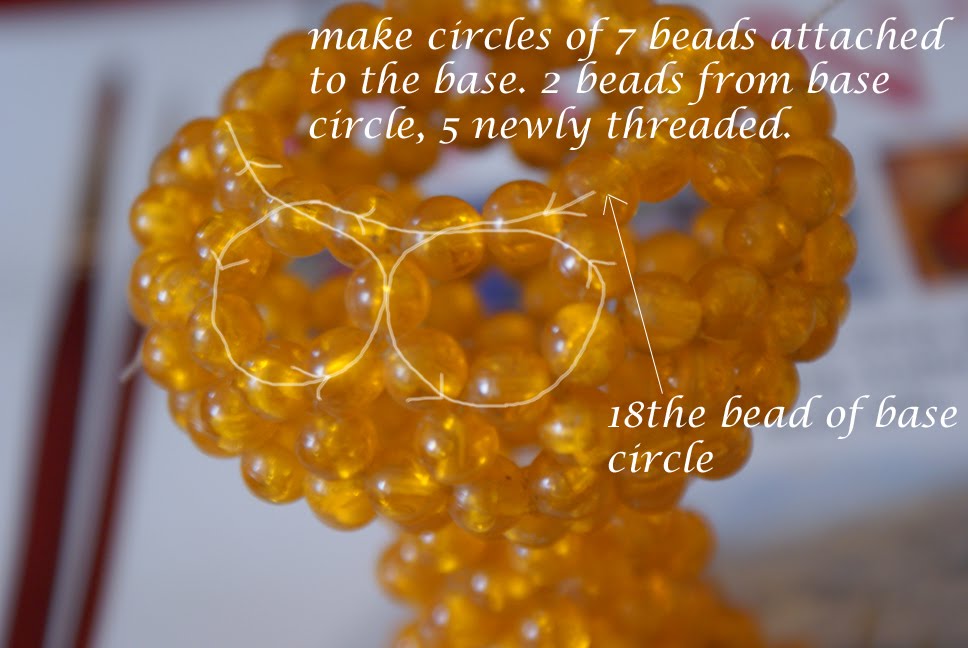 Finish your first round, remember 7 beads per circle. At the end of this step, you have a sort of bead flower in your hands. This is your consolation prize if you feel too fainthearted to go forward. Going forward, I call this layer as layer 1.
Next step is slightly confusing to explain. You have to continue making circles in each layer. Make a circle of 5 beads - 3 new, 2 from the previous layer. This 2 from below layer should ideally be the adjacent beads belonging to 2 different circles from layer 1. Got it? Finished your first circle? Then, you have to again make another circle of 5 beads, now with 4 new and one from the below layer circle (the center one of the 3 new beads that were used in layer 1 for a circle). Again, another circle of 5 beads - 3 new & 2 old. Alternate this circles for your second layer. You will understand it once you start making it.
Layer 3 - circles of 7 beads each - 4 new, 3 from below layer
Layer 4 - circles of 5 beads each - 3 new, 2 from below layer
Layer 5,6,7 - circles of 4 beads each - 3 new, 1 from below layer - This is the neck of the vase
Layer 8 - circle of 5 beads - 4 new, 1 from below layer
Remember that adjacent circles share 1 bead in all layers. So in the layer 3, after the first circle, you need to take only 3 new beads, as one bead is shared from the previous circle in the same layer.
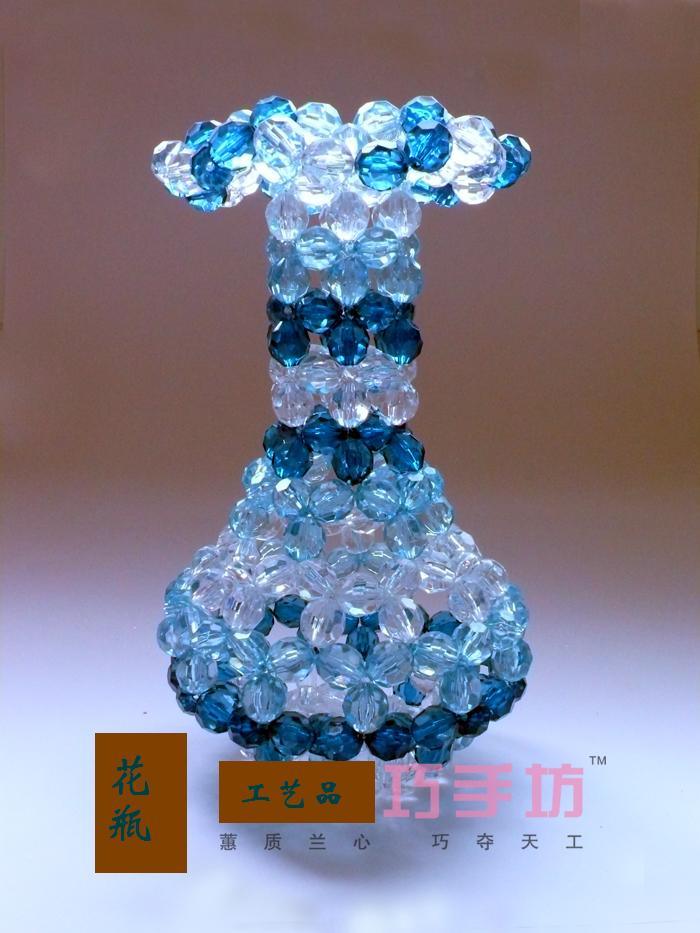
 You can use beads of different colors to make a brighter vase. Share me the photos if you have made a similar vase :)
 There is one similar vase for sale at a Chinese website - you can see the vase here - the number of beads is different in this case.
Hi, the vase is beautiful and the explanation is clear..though confused a bit in the beginning :). Will try to do it and post the pic.
ReplyDeletebye
thanks for your tutorial. i made the similar one.check out the link below.
ReplyDeletehttp://o-artgallery.blogspot.com/2011/11/acrylic-crystal-beaded-flower-vase.html
I have also made a similar vase, ur vase was incredible and beautiful,thanx for your tutorial........
ReplyDeleteThanks for your tutorial, am yet to get it done but I will keep trying
ReplyDeleteHow tall is the vase?
ReplyDeletethankz, ur tutorial z easy to understand
ReplyDeleteThank you very much for your tutorial. I have also made a similar vase. I have posted the picture of the vase. Below is the link to view it.
ReplyDeletehttp://karencraftworkcollection.blogspot.com/2013/07/my-diy-beaded-flower-vase.html
thank you so much. Will attempt it.
ReplyDeleteCan you tell me where to buy the beads
ReplyDeleteThank u...very much
ReplyDeleteI made it
Hi, please what size of beads did you use for the vase?
ReplyDeleteThank you very much. i have made one successfully.
ReplyDeleteWow.thanks
ReplyDelete